
In this post, we are going to explore a great utility of Spring when working with Spring Cloud and Spring Cloud Config Server. It helps us make real-time changes to our properties and apply them. Utilizing it in microservices with Spring Cloud Bus allows us, through a queue, to apply these properties in real-time and refresh our client without the need for service restart.
When working with Spring Cloud, we often have our properties externalized in a GIT repository, and through Spring Cloud Config Server, we can make use of them. This is very useful, but when we need to make a change to a property, we have to restart the instance. To avoid this kind of issue, we use Spring Cloud Bus, which allows us to make any property changes in real-time and apply them to the application, leveraging a message broker.
Spring Cloud Config Bus employs an AMQP broker, but Redis or Kafka can be used as alternatives without problems.
What is Spring Cloud Bus?
As we summarized earlier, Spring Cloud Bus was created with the idea of decoupling microservices’ configuration to apply configuration changes through a message broker.
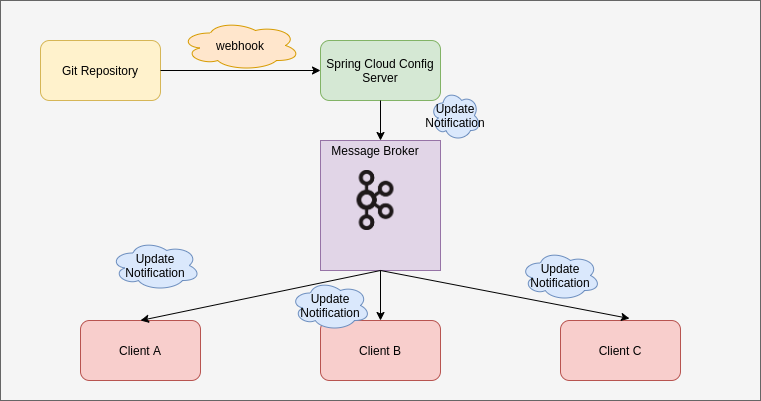
Spring Cloud Bus is always coupled with Spring Cloud Config Server since the latter is responsible for externalized configuration.
This broker can be used as a communication channel between microservices, but the main idea is to use this broker as a Bus, where information is distributed and allows the application to scale.
Spring Cloud Bus will have a series of producers and consumers that will be subscribed to a topic and will receive the latest changes from the config server.
Spring Cloud Bus Configuration
To begin, let’s build upon the example we created with Spring Cloud Config Server, in which we demonstrated configuration externalization using GitHub and Vault.
Once we have downloaded that project, we will add the necessary Maven dependencies:
Maven Dependencies for Spring Cloud Bus
Dependencies in Spring Cloud Config Server
<dependency>
    <groupId>org.springframework.cloud</groupId>
    <artifactId>spring-cloud-config-monitor</artifactId>
</dependency>

<dependency>
    <groupId>org.springframework.cloud</groupId>
    <artifactId>spring-cloud-starter-bus-kafka</artifactId>
</dependency>
As mentioned earlier, we can use different types of brokers, so we opt for Kafka.
Spring-cloud-config-monitor provides us with the /monitor endpoint of the config server, which listens for any events and can send a message to Kafka. For example, by adding a webhook in GitHub, we would trigger this endpoint.
Dependencies in Spring Cloud Client
<dependency>
    <groupId>org.springframework.cloud</groupId>
    <artifactId>spring-cloud-starter-bus-kafka</artifactId>
</dependency>

<dependency>
    <groupId>org.springframework.boot</groupId>
    <artifactId>spring-boot-starter-actuator</artifactId>
</dependency>
It’s important to note that all clients need to connect to Kafka to fetch the new configuration and receive configuration updates.
The spring-boot-starter-actuator dependency will add the /actuator/bus-refresh endpoint, which is responsible for refreshing the client.
Enabling Spring Cloud Bus
To activate Spring Cloud Bus, we need to do it both on the client and the server:
Spring Cloud Client
To enable configuration refreshing on the client, the first step is to add the annotation @RefreshScope. This annotation indicates that we are enabling property refreshing on our client, thanks to the Actuator dependency. This way, when a property changes in our property repository, then we apply the change.
@SpringBootApplication
@RestController
@RefreshScope
public class SpringCloudConfigClientApplication {
}
Once we have added the annotation, we need to activate it in our bootstrap.yml:
spring:
  cloud:
    bus:
      enabled: true
      refresh:
        enabled: true
    kafka:
      bootstrap-servers: ${KAFKA_ADDR:http://localhost:9092}
There is additional configuration that can be seen in the complete example. Here, we have enabled Spring Cloud Bus and Kafka.
Spring Cloud Config Server
Just as we did on the client side, we need to enable the configuration on the server. To do this, we add the Kafka configuration.
  cloud:
    bus:
      enabled: true
    kafka:
      bootstrap-servers: ${KAFKA_ADDR:http://localhost:9092}
There is additional configuration that can be seen in the complete example. Here, we have enabled Spring Cloud Bus and Kafka.
GitHub Webhook
All the configuration for both the client and server parts is now complete.
Whenever a change occurs, a message will be sent to our Kafka queue. The client will listen to the message and update its configuration.
The only thing left to do, since we are using GitHub, is to create a webhook so that the server is aware of any changes.
To do this, go to your GitHub settings and select Webhook. Click on “Add webhook.” You need to add the payload URL, which is our endpoint /monitor (see above), and change the content type to application/json. Leave the secret empty and click “Add.”
Now, every change will be notified to the /monitor endpoint provided by the Spring-cloud-config-monitor dependency. Just keep in mind that the IP you specify must be reachable. For example: http://root:s3cr3t@REMOTE_IP:8888/monitor
Conclusion
Externalizing properties in a microseOrchestration Architecture in Microservicesrvices architecture is of vital importance to have a single point of control. And if we add the ability to make changes and auto-refresh the properties of our microservices with Spring Cloud Bus, we are adding simplicity to our architecture.
If you want to see the complete example of our microservices exercise with Spring Cloud Bus, you can check it out on our Github.