In this new entry, GraphQL Example with Spring Boot and Netflix DGS, we will see how to build an application with Netflix DGS (Domain Graph Service) that simplifies GraphQL development.
What is Netflix Domain Graph Service?
Netflix Domain Graph Service (DGS) is a new open-source framework created internally at Netflix that simplifies and aids in the implementation of Spring Boot applications with GraphQL.
Some of the features of DGS include:
- It is an annotation-based system similar to Spring Boot.
- It integrates with Spring Security.
- Error handling.
- GraphQL client for Java.
- Supports WebSockets, SSE, file uploads, and GraphQL Federation.
Hands On
The complete example is available on our GitHub.
Let’s get started to build our GraphQL example with Spring Boot and Netflix DGS.
For our example, we will use an in-memory relational database with H2 to simplify our example using JPA. Our example consists of three very basic entities: Bank, User, and Account Bank, where a user has one or more bank accounts in a bank, and a bank has one or more bank accounts.
In our application, we will use Lombok to eliminate Java boilerplate.
Maven Dependencies for Using Netflix DGS
<dependency>
   <groupId>com.netflix.graphql.dgs</groupId>
   <artifactId>graphql-dgs-spring-boot-starter</artifactId>
   <version>${netflix-dgs.version}</version>
</dependency>
The above dependency is the only one necessary to add Netflix DGS to our application. Of course, you will need to add more dependencies for your application.
<dependency>
   <groupId>org.springframework.boot</groupId>
   <artifactId>spring-boot-starter-web</artifactId>
</dependency>
<dependency>
   <groupId>org.springframework.boot</groupId>
   <artifactId>spring-boot-starter-data-jpa</artifactId>
</dependency>
<dependency>
  <groupId>com.h2database</groupId>
  <artifactId>h2</artifactId>
  <scope>runtime</scope>
</dependency>
Schema Creation in GraphQL
Just as we do with a relational database, we will create schemas for GraphQL. The schemas we create should be placed in the /src/main/resources/schemas directory, and Netflix DGS will be responsible for loading the schemas from this directory.
For each schema, we have created a different file with the .graphqls extension. In these files, we define a QueryResolver type, which will have two different queries, and a MutationResolver to create objects in the database.
Both QueryResolver and MutationResolver should be defined as replacements for Query and Mutation, as shown below.
For our example, we will create three different schemas: account, user, and bank.
type QueryResolver {
    users: [User]
    user(id: ID!): User!
}

type MutationResolver {
    createUser(user: UserInput!): User
}

input UserInput {
    firstName: String!
    lastName: String!
    address: String!
    country: String!
    city: String!
    age: Int
}

type User {
    id: ID!
    firstName: String!
    lastName: String!
    address: String!
    country: String!
    city: String!
    age: Int!
    bank: Bank
    accounts: [Account]
}

schema {
    query: QueryResolver
    mutation: MutationResolver
}
In the above file, we see the creation of a user using a QueryResolver for queries and a MutationResolver for creations. Additionally, you’ll notice that we’ve redefined the schema’s query and mutation to use MutationResolver and QueryResolver. If not defined, it would default to being called Query and Mutation.
extend type QueryResolver {
    banks: [Bank]
    bank(id: String!): Bank!
}

extend type MutationResolver {
    createBank(bank: BankInput!): Bank
}

input BankInput {
    name: String!
    country: String!
}

type Bank {
    id: ID!
    name: String!
    country: String!
    users: [User]
    accounts: [Account]
}
The main difference from the previous schema is that, in Bank, as in the following schema, we use “extend” (for QueryResolver and MutationResolver) because we cannot have more of the same type, and we need to use “extend.”
extend type QueryResolver {
    accounts: [Account]
    account(id: ID!): Account!
}

extend type MutationResolver {
    createAccount(account: AccountInput!): Account
}

input AccountInput {
    name: String!
    alias: String!
    amount: Float
    userId: String!
    bankId: String!
}

type Account {
    id: ID!
    name: String!
    user: User!
    bank: Bank!
}
With the creation of these files, we can see one of the main differences between GraphQL and REST. For instance, in REST, to retrieve a user object, you would need to create an endpoint, and to retrieve all users, you’d need a completely different endpoint. GraphQL solves these two problems without the need for new endpoints, simply through its schema definition. We’ll see this with an example later.
All fields marked with a “!” are mandatory in the query.
Creation of Entities in Spring Boot
Next, we are going to create the entities responsible for mapping with our relational database and our GraphQL schema.
@Entity
@AllArgsConstructor
@NoArgsConstructor
@Getter
@Setter
public class User {

    @Id
    @GeneratedValue
    private UUID id;

    private String firstName;

    private String lastName;

    private int age;

    private String address;

    private String country;

    private String city;

    @OneToMany(mappedBy = "user")
    private Set<Account> accounts;

    @ManyToOne()
    private Bank bank;
}
Let’s continue with the bank, which will have a OneToMany relationship with user and account.
@Entity
@Data
@AllArgsConstructor
@NoArgsConstructor
@EqualsAndHashCode
public class Bank {

    @Id
    @GeneratedValue
    private UUID id;

    private String name;

    private String country;

    @OneToMany(mappedBy = "bank")
    private Set<User> users;

    @OneToMany(mappedBy = "bank")
    private Set<Account> accounts;
}
And finally, we create the account object, which will have an object of type User and another of type Bank.
@Entity
@AllArgsConstructor
@NoArgsConstructor
@Getter
@Setter
public class Account {

    @Id
    @GeneratedValue
    private UUID id;

    private String name;

    private String alias;

    private BigDecimal amount;

    @ManyToOne(fetch = FetchType.LAZY)
    private User user;

    @ManyToOne(fetch = FetchType.LAZY)
    private Bank bank;
}
Creation of Mutation Objects
As we mentioned before, we’ve created a MutationResolver type for each schema, so we need to create a new object that we will pass to it for creation. In other words, it will be the object with which it binds when the request is made and invoked, and it will also have the name we’ve given it in the schema.
@AllArgsConstructor
@NoArgsConstructor
@Getter
@Setter
public class UserInput {

    private String firstName;

    private String lastName;

    private int age;

    private String address;

    private String country;

    private String city;
}
In the UserInput class, we’ve created the fields with which a new user can be created.
@Getter
@Setter
@AllArgsConstructor
@NoArgsConstructor
@EqualsAndHashCode
public class BankInput {

    private String name;

    private String country;
}
The BankInput class will only have two fields. The IDs will be created when a new record is created.
@AllArgsConstructor
@NoArgsConstructor
@Getter
@Setter
public class AccountInput {

    private String name;

    private String alias;

    private BigDecimal amount;

    private UUID userId;

    private UUID bankId;
}
Finally, we create AccountInput, which will have two fields, userId and bankId, of type UUID, representing the relationships with their respective database tables.
Creation of Repositories with Spring Boot
For the persistence layer or repository, we will use JpaRepository, which provides all the JPA facilities to save and query our database objects.
For example, for Account, it would be as follows:
public interface AccountRepository extends JpaRepository<Account, UUID> {
}
Once we’ve completed all the entities, schemas, input, and the persistence layer, it’s time for the magic brought by Netflix.
Netflix’s DGS with Spring Boot
Netflix has created its DGS framework based on annotations supported by Spring Boot. Below, we’ll highlight the essential annotations to consider in order to have an application working with GraphQL and Spring Boot.
- @DgsComponent: This annotation is responsible for indicating that a class will perform queries. The class should carry this annotation in its definition.
- @DgsData: Every method that contains the logic to execute a query should be annotated with @DgsData. In this annotation, you’ll include the parent type, which is the schema type, and the field defined in the schema.
- @InputArgument: This annotation is used to define the argument passed as a parameter in the query.
- @DgsQuery: It is a shorthand for @DgsData when the parentType is a query.
- @DgsMutation: It is a shorthand for @DgsData when the parentType is Mutation.
Another aspect to consider when working with DGS is the ability to create a custom context by implementing the DgsCustomContextBuilder class. You can use it for logs, storing states, or saving information accessed through the DataFetchingEnvironment class. You can see its usage in the example class UserQuery.
Query with Netflix’s DGS in Spring Boot
Next, we’ll see a query class with Netflix’s DGS, making use of some of the annotations we mentioned earlier:
@DgsComponent
@RequiredArgsConstructor
public class UserQuery {

    private final UserRepository userRepository;

    private final CustomContextBuilder contextBuilder;


    @DgsData(parentType = "QueryResolver", field = "users")
    public Iterable<User> findAll(DgsDataFetchingEnvironment dfe) {

        var users = (List<User>) userRepository.findAll();

        contextBuilder.customContext(users, null, null).build();

        return users;
    }

    @DgsData(parentType = "QueryResolver", field = "user")
    public User findById(@InputArgument("id") String id, DataFetchingEnvironment dfe) {

        CustomContext customContext = DgsContext.getCustomContext(dfe);

        var users = customContext.getUsers();


        if (null != users) {
            var user = users.stream().filter(u -> u.getId().equals(UUID.fromString(id))).findFirst();

            return user.orElseGet(() -> userRepository.findById(UUID.fromString(id)).orElseThrow(DgsEntityNotFoundException::new));

        } else {

            return userRepository.findById(UUID.fromString(id)).orElseThrow(DgsEntityNotFoundException::new);
        }

    }
}
A notable feature of this class is the use of CustomContextBuilder, which is a class that has created a custom context where different objects are added to allow direct access.
Mutation with Netflix’s DGS in Spring Boot
Next, we will look at the UserMutation class, which is responsible for saving a new user in the database.
As you can see in the @DgsData annotation, we first indicate that the parentType is MutationResolver, and the field is createUser, which matches the definition in the schema.
@DgsComponent
@RequiredArgsConstructor
public class UserMutation {

    private final UserRepository userRepository;

    @DgsData(parentType = "MutationResolver", field = "createUser")
    public User createUser(@InputArgument("user") UserInput user) {
        return userRepository.save(new User(null, user.getFirstName(), user.getLastName(), user.getAge(), user.getAddress(), user.getCountry(), user.getCity(), null, null));
    }

}
Testing Netflix’s DGS application with Spring Boot
Once we have completed the application and implemented everything, it’s time to run a few queries.
We run our application with:
mvn spring-boot:run
We access the page http://localhost:8080/graphiql, and an interface will appear where we can execute our queries.
Let’s see some examples:
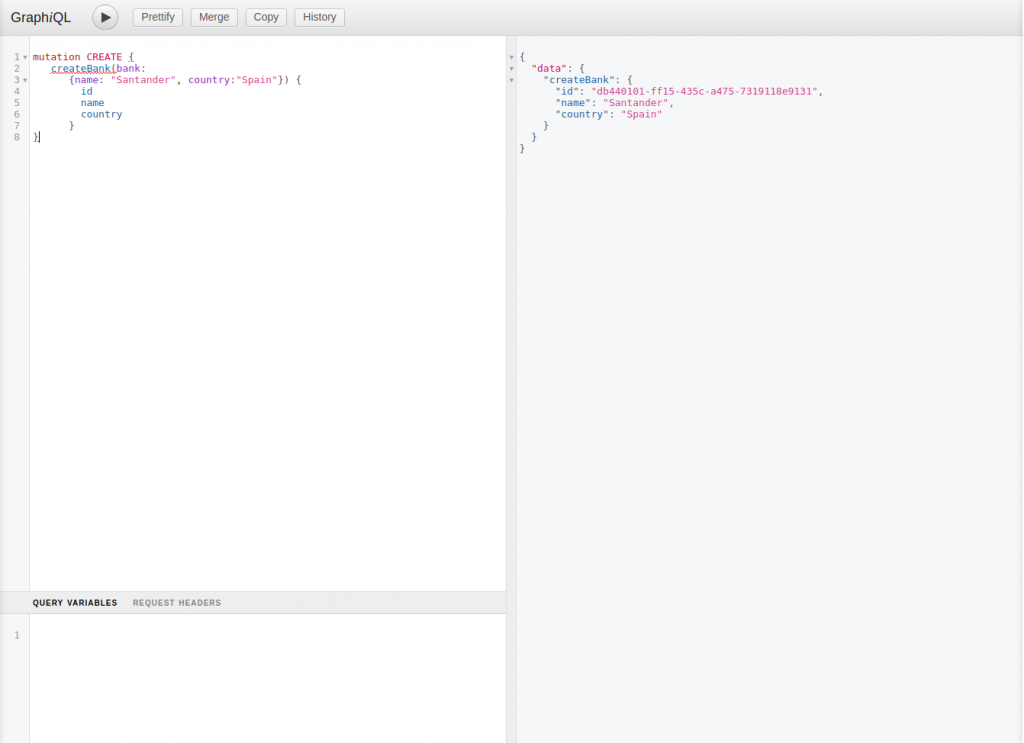
Creating a bank:
mutation CREATE {
   createBank(bank:
      {name: "Santander", country:"Spain"}) {
        id
        name
        country
      }
}
Fetching all banks:
{
 banks{
  id
  name
  country
 }
}
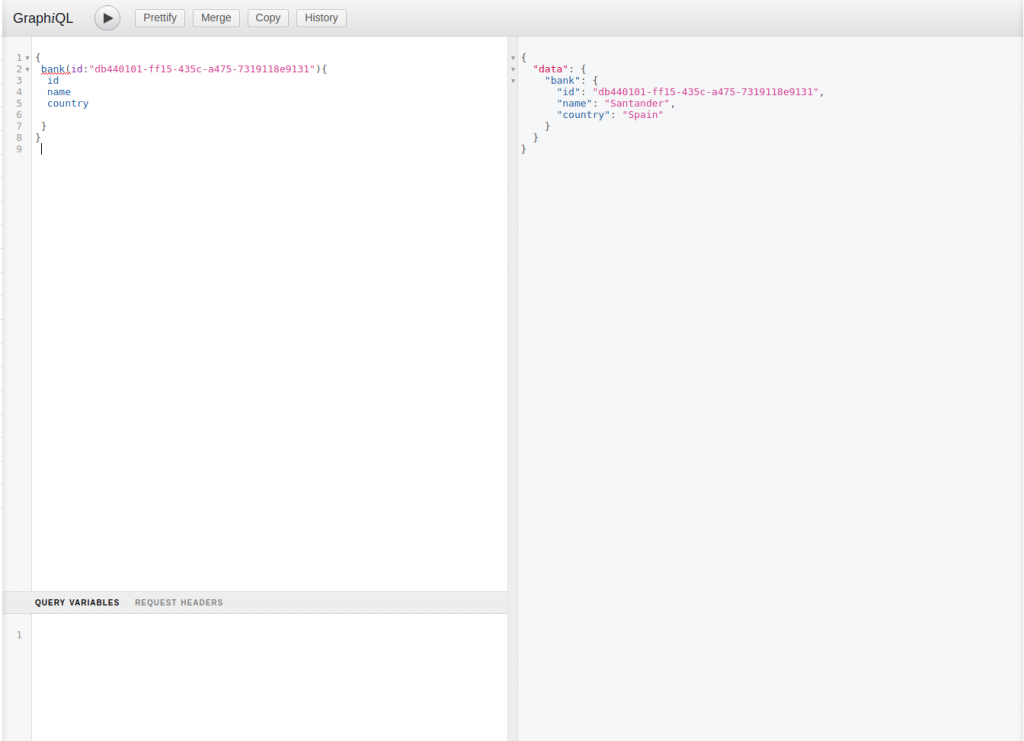
Get bank by id:
{
 bank(id:"db440101-ff15-435c-a475-7319118e9131"){
  id
  name
  country

 }
}
With GraphQL, we can display the fields we want, as long as they are present in the object. For example, with the previous case, we could only display the ID as follows:
{
 bank(id:"db440101-ff15-435c-a475-7319118e9131"){
  id
  }
}
With these examples, we have seen how, with the definition in the Schema of users and user, we can obtain the data we need without the need to create new endpoints or additional logic, as would be required with REST. If we need, for instance, additional information, we would simply add that new method to the schema.
Conclusion on GraphQL Example with Spring Boot and Netflix DGS
Netflix’s Domain Graph Service (DGS) framework has significantly simplified the development of GraphQL with Spring Boot, making it much easier to build any API.
The use of GraphQL is becoming increasingly common as it positions itself as an alternative to the widespread use of REST, thanks to its adaptability and flexibility, among other features.
If you want, you can download the complete example from our GitHub.