
In this new Refactorizando entry on “Spring Data Example with PostgreSQL and Docker,” we will learn how to build a Spring Boot application using Spring Data dependency. We will set up a PostgreSQL database using Docker and connect it to our Spring Boot application.
Spring Data is a module within the Spring framework that aims to simplify configuration and persistence tasks for developers.
PostgreSQL, also known as Postgres, is a free and open-source SQL database.
Run PostgreSQL with Docker
To start, we will create and set up a PostgreSQL database with Docker using the following command:
Make sure you have Docker installed on your local machine. You can check by running
$docker -v.
docker run --network host --name postgres -e POSTGRES_PASSWORD=postgres -d postgres
Once PostgreSQL is up and running, you can verify its status by connecting with a database management tool or entering the container using the following command:
docker exec -it <id del contenedor> bash
psql -h localhost -U postgres
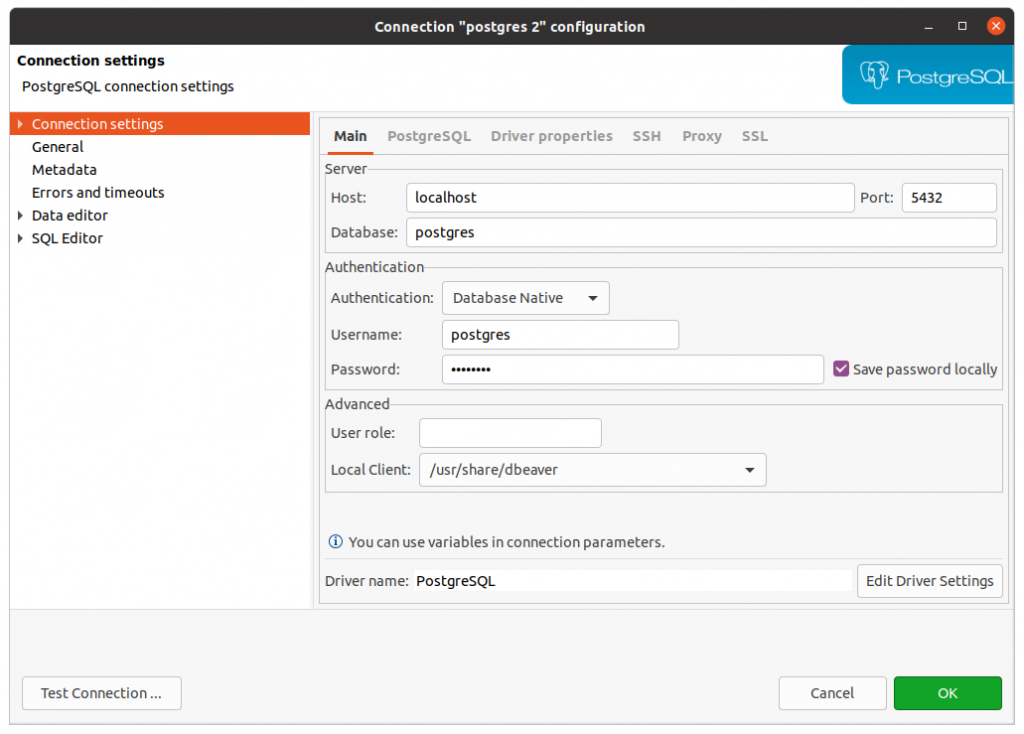
You can also use a database management tool like DBeaver to establish a connection with PostgreSQL.
Spring Boot Configuration with PostgreSQL
Maven Dependencies for a Project with Spring Data
For a new Spring Boot project with Spring Data, the easiest way is to use the Spring Initializr and add the required dependencies.
Once you have generated the project, your pom.xml should include the following dependencies:
<?xml version="1.0" encoding="UTF-8"?>
<project xmlns="http://maven.apache.org/POM/4.0.0" xmlns:xsi="http://www.w3.org/2001/XMLSchema-instance"
	xsi:schemaLocation="http://maven.apache.org/POM/4.0.0 https://maven.apache.org/xsd/maven-4.0.0.xsd">
	<modelVersion>4.0.0</modelVersion>
	<parent>
		<groupId>org.springframework.boot</groupId>
		<artifactId>spring-boot-starter-parent</artifactId>
		<version>2.4.0</version>
		<relativePath/> <!-- lookup parent from repository -->
	</parent>
	<groupId>com.refactorizando</groupId>
	<artifactId>spring-data-postgresql-example</artifactId>
	<version>0.0.1-SNAPSHOT</version>
	<name>spring-data-postgresql-example</name>
	<description>Spring Data example with PostgreSql</description>

	<properties>
		<java.version>11</java.version>
	</properties>

	<dependencies>
		<dependency>
			<groupId>org.springframework.boot</groupId>
			<artifactId>spring-boot-starter-data-jpa</artifactId>
		</dependency>
		<dependency>
			<groupId>org.springframework.boot</groupId>
			<artifactId>spring-boot-starter-web</artifactId>
		</dependency>

		<dependency>
			<groupId>org.springframework.boot</groupId>
			<artifactId>spring-boot-starter-test</artifactId>
			<scope>test</scope>
		</dependency>

		<dependency>
			<groupId>org.postgresql</groupId>
			<artifactId>postgresql</artifactId>
			<version>${postgresql.version}</version>
		</dependency>
	</dependencies>

	<build>
		<plugins>
			<plugin>
				<groupId>org.springframework.boot</groupId>
				<artifactId>spring-boot-maven-plugin</artifactId>
			</plugin>
		</plugins>
	</build>

</project>
The key dependencies for this project are:
		<dependency>
			<groupId>org.springframework.boot</groupId>
			<artifactId>spring-boot-starter-data-jpa</artifactId>
		</dependency>
		<dependency>
			<groupId>org.postgresql</groupId>
			<artifactId>postgresql</artifactId>
			<version>${postgresql.version}</version>
		</dependency>
spring-boot-starter-data-jpa: Provides the necessary configuration for Spring Data.postgresql: Includes the PostgreSQL driver for connecting to the database.
Connection Configuration
Once we have generated the project structure, it’s necessary to establish the connection configuration with our database. We will do this through the application.yml or application.properties file located in the src/main/resources directory. In this folder, you will find either application.yml or application.properties. Let’s configure them to establish the connection with our database.
Although the quickest and most convenient way is to use configuration files, leveraging Spring’s auto-configuration, we can also configure it programmatically. Here’s an example using YAML format:
spring:
  data:
    jpa.repositories.enabled: true
  datasource:
    initialization-mode: always
    driverClassName: org.postgresql.Driver
    url: jdbc:postgresql://localhost:5432/postgres
    username: postgres
    password: postgres
    continueOnError: true
Please make sure to adjust the values according to your database configuration.
Note that if the repository package is not a subpackage of the main Spring class, you need to activate Spring JPA using the @EnableJpaRepositories annotation. Specify the base package for your repository. This is necessary because auto-configuration and package scanning don’t work in such cases:
@EnableJpaRepositories(basePackages = "com.refactorizando.example.....repository")
Entity Creation
Once the database configuration is done, it’s necessary to create a database entity that represents a table. We’ll use @Entity and @Table annotations to create and map the entity to the database table.
Repository Configuration with JPA
Spring Data integrates with Java Persistence API (JPA), which is a Java specification that allows us to persist and retrieve objects from the database. It abstracts us from the underlying implementation details of object persistence.
By using the JpaRepository interface, we get basic CRUD operations and some predefined methods.
Here are some possibilities offered by JpaRepository:
- Defining custom methods in the interface with its own syntax to generate queries.
- Generating queries using JPQL with
@Query. - Using specifications.
- Using JPA Named Queries.
Some of the predefined methods are:
- <S extends T> S save(S entity)
- Optional<T> findById(ID primaryKey)
- Iterable<T> findAll()
- long count(); void delete(T entity)
- boolean existsById(ID primaryKey)
In this Refactorizando entry, we will focus on creating a CRUD that extends JpaRepository, a query using @Query, and an automatically generated query to demonstrate how to work with a relational database.
To begin, we create an interface that extends JpaRepository as follows:
Creation of a JPQL Query (@Query)
As we mentioned in the previous point, we can create queries using the @Query annotation, which has a syntax similar to SQL.
This syntax and the use of this annotation allow us to create the queries we need when the predefined methods or methods provided by JPA are not sufficient.
@Query("SELECT c FROM Car c WHERE c.model = :model")
List<Car> getCarsByModel(@Param("model") String model);
Automatic Query Generation with Spring Data
When we generate a new repository with Spring Data, an implementation of the generated methods is created in the interface. During the generation of these methods, queries are attempted to be generated based on the fields of the entity class. This way of defining new queries is quite simple and clean, as it saves you from creating the query boilerplate.
Let’s see this in more detail by creating two methods to find cars by brand and model:
public interface CarRepository extends JpaRepository<Car, Long> {

    List<Car> findByModel(String model);

    List<Car> findByBrand(String brand);


}
As you can see, creating new queries is straightforward. Just ensure that the field or fields you are querying exist. Moreover, there are many more options available, such as sorting and filtering. You can explore more options by clicking here.
Transactions with Spring Data
By using JpaRepository, we are indirectly using @Transactional since the parent classes are marked with @Transactional for methods that can modify the database.
However, the @Transactional annotation can also be used outside repositories to mark methods that may involve multiple modification operations on the database. This annotation should be applied to public methods:
  @Service
  public class MyService{
   @Transactional
    public void save() {
        repo.save(..);
        repo.deleteById(..);
    }
}
Make sure to use
@Transactionalfor all methods that may make changes to your database.
Integration Testing with Testcontainers
Testing is a crucial part of our applications, including testing the integration with the database and application logic. To perform integrated tests against our database, we can use an in-memory embedded database like H2 or Testcontainers.
Using Testcontainers might be the best approach as it creates a containerized instance of the chosen database, closely resembling the real environment. It only requires a small configuration and loading of the desired database image.
You can see a complete example of usage and how Testcontainers work in this link.
Example of Spring Data with PostgreSQL
Now that we’ve seen how Spring Data works, let’s explore a small example that connects our Spring Boot application with our PostgreSQL database. Let’s now provide an example of using Spring Data with PostgreSQL and Docker.
You can find the complete example on our GitHub.
In our example, we’ll work with a car entity that will have CRUD operations on a database.
We’ll start with the Car entity, which is responsible for mapping and saving the Car object in the database. To create the table or have the database return a table for this object, we need to add the @Table and @Entity annotations.
@Table
@Entity
@Getter
@Setter
public class Car {

    @Id
    @GeneratedValue(strategy = GenerationType.AUTO)
    private UUID id;

    @Column
    private String model;

    @Column
    private String description;

    @Column
    private String color;

}
Next, we’ll create our repository layer, which in this case extends JpaRepository. This interface provides a JPA implementation, offering basic CRUD methods and more, such as the flush() method mentioned earlier.
public interface CarRepository extends JpaRepository<Car, UUID> {

}
Once we’ve created our repository layer, which communicates with our database, we’ll create a service layer responsible for calling the repository and adding business logic if needed.
@AllArgsConstructor
@Service
public class CarService {

    private final CarRepository carRepository;

    public List<Car> findAll() {

        return carRepository.findAll();
    }

    public Car findById(UUID uuid) {
        return carRepository.findById(uuid).orElseThrow(() -> new NoSuchElementException());
    }

    public Car saveCar(Car car) {
        return carRepository.save(car);
    }

    public void deleteCar(UUID uuid) {

        carRepository.deleteById(uuid);
    }

    public Car updateCar(Car car) {
        return carRepository.save(car);
    }

    public boolean existById(UUID uuid) {
        return carRepository.existsById(uuid);
    }
}
Finally, we need to create the API layer to communicate with our service, so we’ll add a controller. This controller will have the necessary endpoints to perform CRUD operations. Note that we’ve added the @RequestMapping annotation with the path /api/cars for our service.
@RestController
@RequestMapping("/api/cars")
@RequiredArgsConstructor
public class CarController {

    private final CarService carservice;

    @GetMapping()
    public ResponseEntity<List<Car>> getAllcars() {

        return new ResponseEntity<>(carservice.findAll(), HttpStatus.OK);
    }

    @GetMapping("/{id}")
    public ResponseEntity<Car> getCarById(@PathVariable("id") String id) {

        return new ResponseEntity<>(carservice.findById(UUID.fromString(id)), HttpStatus.OK);
    }

    @PostMapping()
    public ResponseEntity<Car> createCar(@RequestBody Car car) {

        return new ResponseEntity<>(carservice.saveCar(car), HttpStatus.CREATED);
    }

    @PutMapping("/{id}")
    public ResponseEntity<Car> updateCar(@PathVariable("id") String id, @RequestBody Car car) {

        if (carservice.existById(UUID.fromString(id))) {
            return new ResponseEntity<>(carservice.saveCar(car), HttpStatus.ACCEPTED);
        }

        throw new IllegalArgumentException("Car with id " + id + "not found");
    }

    @DeleteMapping("/{id}")
    public ResponseEntity<HttpStatus> deleteCar(@PathVariable("id") String id) {

        carservice.deleteCar(UUID.fromString(id));

        return new ResponseEntity<>(HttpStatus.NO_CONTENT);
    }

}
Finally, we shouldn’t forget about integration testing in our application, which can be done using Testcontainers. Let’s take a look at the code:
@Testcontainers
@SpringBootTest(webEnvironment = SpringBootTest.WebEnvironment.RANDOM_PORT)
@AutoConfigureTestDatabase(replace = AutoConfigureTestDatabase.Replace.NONE)
public class CarRepositoryPropertiesIntegrationTest {

  @Autowired
  private CarRepository carRepository;


  @DynamicPropertySource
  static void postgresqlProperties(DynamicPropertyRegistry registry) {
    registry.add("spring.datasource.url", postgreSQLContainer::getJdbcUrl);
    registry.add("spring.datasource.password", postgreSQLContainer::getPassword);
    registry.add("spring.datasource.username", postgreSQLContainer::getUsername);
  }

  @Container
  public static PostgreSQLContainer postgreSQLContainer = new PostgreSQLContainer("postgres:11-alpine")
      .withDatabaseName("integration-tests-db")
      .withPassword("inmemory")
      .withUsername("inmemory");


  @Test
  public void save_and_read_car() {
    Car car = new Car();
    car.setDescription("New car");

    carRepository.save(car);

    List<Car> allCars = carRepository.findAll();

    assert !allCars.isEmpty();
    assert allCars.get(0).getDescription().equalsIgnoreCase("New car");
    assert allCars.size() == 1;
  }


}
In the previous class, using Testcontainers annotations, we have created an integrated test for our repository against our database. If you want to read more information about Testcontainers and how it works, you can do so here.
Conclusion
In this example of Spring Data with PostgreSQL and Docker, we have seen how Spring Data makes it easier for us to perform necessary operations with our database in an easy and efficient manner.
You can find the complete example on our Github.