
Spring provides the entry point to our application through controllers. In this article about the use of controllers in Spring Boot, we will see how they work and how they provide access to our application.
How does Controller work in Spring?
A controller is the entry point to our application. It intercepts the call, adapts the input data, processes it, and returns it.
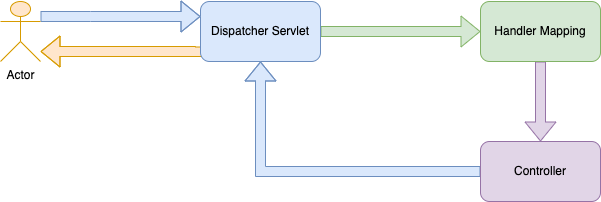
In the diagram shown, we can see that the Dispatcher Servlet is responsible for requests and is the front controller in the architecture.
Although the most common way to use Spring is to use REST through the @RestController annotation, we can also show views with JSP. So the above diagram may vary slightly, since it has focused solely on returning the response without views.
Configuration of Controllers in Spring Boot
Spring Boot facilitates all auto-configuration thanks to the use of starters and the auto-configuration it adds. If we use Spring MVC, the configuration can be somewhat more tedious, since we would have to make configurations through the WEB.xml and in a much more programmatic way.
To use Controllers in Spring, the first thing is to add the dependency:
<dependency>
    <groupId>org.springframework.boot</groupId>
    <artifactId>spring-boot-starter-web</artifactId>
</dependency>
The spring boot starter uses Spring MVC, REST, and Tomcat by default as an embedded server and also adds the following dependencies transitively:
- org.springframework.boot:spring-boot-starter
- org.springframework.boot:spring-boot-starter-tomcat
- org.springframework.boot:spring-boot-starter-validation
- com.fasterxml.jackson.core:jackson-databind
- org.springframework:spring-web
- org.springframework:spring-webmvc
By adding this dependency, we can configure our Controller with the @Controller and @RestController annotations.
Using REST Controllers in Spring Boot
For all REST applications, we will use the @RestController annotation, which will allow us to receive and respond to REST requests.
The request made will be returned and sent in XML or JSON format, and we can also return the desired status code in the response to know the state of the response.
Let’s see an example of its use:
@RestController
public class RestControllerExample {
    @GetMapping(value = "/users/{userId}")
    public ResponseEntity<User> getUser(@PathVariable Long userId) {
        //do something

        User user = userService.getUser(userId);

        return ResponseEntity.ok(user);
    }
}
The above ResponseEntity will write the body in the HTTP response indicating the HTTP code of the response.
If we do not want to use ResponseEntity, we can use the @ResponseBody annotation in the following way, although we do not explicitly indicate the Status Code.
@RestController
public class RestControllerExample {
    @GetMapping(value = "/users/{userId}")
    public @ResponseBody getUser(@PathVariable Long userId) {
        //do something

        User user = userService.getUser(userId);

        return user;
    }
}
With the @ResponseBody annotation, we are telling Spring to write only the result directly in the HTTP response. With this approach we avoid any view resolution.
As important information, together with controllers, other Spring annotations such as: @GetMapping, @PostMapping, @PathVariable, @RequestParam, etc. are used, which are necessary as the entry point to the application.
Using @Controller in Spring
The most common thing when we use @Controller in Spring is to return a view, usually JSP or Thymeleaf. We will return a ModelAndView object, which contains a view and a model that will be used by the View Resolver to render the view.
For example, if we use the previous examples:
@RestController
public class RestControllerExample {
    @GetMapping(value = "/users/{userId}")
    public ModelAndView getUser(@PathVariable Long userId) {

        User user = userService.getUser(userId);
        ModelAndView mv = new ModelAndView();
        mv.setViewName("user");
        mv.getModel().put("info", user);

        return mv;
    }

}
In the previous code snippet, what we have done is to create a method that returns a ModelAndView with the provided information. This ModelAndView will receive a User object which will be accessible from the view by calling the info element.
The View Resolver will be responsible for searching in our WEB-INF for the view called “user” with the defined extension.
Conclusion
To be able to provide API access to our applications, it is essential to use Controllers in Spring Boot. You cant take a look at this example.
If you need more information, you can leave us a comment or send an email to refactorizando.web@gmail.com You can also contact us through our social media channels on Facebook or twitter and we will be happy to assist you!!