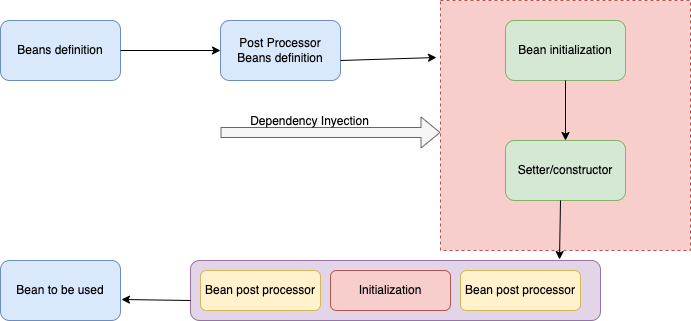
In this post, we will try to see a Guide to Spring BeanPostProcessor is since we often use it without knowing. It is very important to understand this type of beans, not only to know how to use them but also to enhance our knowledge of the Spring lifecycle.
What is a BeanPostProcessor?
First of all, let’s define what a BeanPostProcessor is. The BeanPostProcessor is responsible for processing each bean available within the IoC container, extending the functionality of the IoC container and adding logic for instantiation, dependency handling, etc. If you have any doubts about how dependency injection works, you can take a look here.
Basically, a BeanPostProcessor is an interface that defines two methods: postProcessBeforeInitialization() and postProcessAfterInitialization(). These two callback methods are called by the IoC container before and after the instantiation, configuration, and initialization of each bean.
Some Spring AOP classes (for example, AbstractAdvisingBeanPostProcessor) are implemented as bean post-processors to provide proxy adjustment logic.
If there are multiple instances of BeanPostProcessor, we can control the instantiation order by implementing the Ordered interface or setting the Order property.

BeanPostProcessor Example in Spring
Let’s understand it better with an example. We will see how the BeanPostProcessor works and how we can track the bean’s instantiation before and after.
public class HelloBeanPostProcessor implements BeanPostProcessor {

    @Override
    public Object postProcessBeforeInitialization(Object bean, String beanName)
            throws BeansException {
        System.out.println("Llamada a beanPostProcessor antes del proceso de inicialización del bean: "+beanName + "class : "+bean.getClass());
        return bean;
    }

    @Override
    public Object postProcessAfterInitialization(Object bean, String beanName)
            throws BeansException {
                System.out.println("Llamada a beanPostProcessor después de la inicialización del bean: "+beanName + "class : "+bean.getClass());
        return bean;
    }
}
In this example, we have seen how by implementing the BeanPostProcessor interface, we can implement its two methods to track the creation of a bean.
If we want to register our HelloBeanPostProcessor, we need to create its bean. We can do this by adding @Component or registering it with @Bean. Let’s see another example where we add @Component.
BeanPostProcessor Example with Ordered
In this second example, we will implement the BeanPostProcessor interface and also the Ordered interface to order its execution relative to other BeanPostProcessors.
@Component
public class HelloBeanPostProcessor implements BeanPostProcessor, Ordered {

    @Override
    public Object postProcessBeforeInitialization(Object bean, String beanName)
            throws BeansException {

        System.out.println("Llamada a beanPostProcessor antes del proceso de inicialización del bean: "+beanName + "class : "+bean.getClass());        return bean;
    }

    @Override
    public Object postProcessAfterInitialization(Object bean, String beanName)
            throws BeansException {

                System.out.println("Llamada a beanPostProcessor después de la inicialización del bean: "+beanName + "class : "+bean.getClass());
        return bean;
    }

    @Override
    public int getOrder() {
        return Integer.MAX_VALUE;
    }

}
Conclusion
In this post, we have seen a Guide to Spring BeanPostProcessor and how Spring BeanPostProcessor works and how we can use it. This will help us understand the Spring lifecycle and bean creation better.
If you need more information, you can leave us a comment or send an email to refactorizando.web@gmail.com You can also contact us through our social media channels on Facebook or twitter and we will be happy to assist you!!
